Quickstart
Getting started with CheerpX
What CheerpX Does
CheerpX is an x86 virtualization technology for running executables and operating systems entirely client-side. Upon completing the steps below, you’ll be able to run Linux executables right within your web browser!
1. Include CheerpX on your page
No installation is needed. Simply include CheerpX by adding the following script tag in the <head> or at the end of the <body> section of your HTML:
<script src="https://cxrtnc.leaningtech.com/1.2.2/cx.js"></script>The CheerpX’s API is stable and breaking changes can only be introduced on a new major version. All CheerpX builds are immutable so you can trust that, if your application works today, it is going to work identically forever.
ES6 Module Compatibility
CheerpX is also available as an ES6 JavaScript module. If you prefer to use the ES6 module version, you can include it like this:
<script type="module"> import * as CheerpX from "https://cxrtnc.leaningtech.com/1.2.2/cx.esm.js"; self.CheerpX = CheerpX;</script>When using the ES6 module version, you don’t have to assign the imported CheerpX to the global scope. This example is intended to keep compatibility with the traditional script inclusion method used in this documentation.
2. Create an application instance
To start using CheerpX, create an instance by calling the CheerpX.Linux.create method, which is available globally once the script is included.
The example below demonstrates how to set up the file system and devices using WebVM’s debian_large image, but you can also create your own images.
<!doctype html><html lang="en" style="height: 100%;">  <head>    <meta charset="utf-8" />    <title>CheerpX Getting Started</title>    <script src="https://cxrtnc.leaningtech.com/1.2.2/cx.js"></script>    <script type="module">      // The read-only disk image from Leaning Technologies' fast cloud backend      const cloudDevice = await CheerpX.CloudDevice.create(        "wss://disks.webvm.io/debian_large_20230522_5044875331.ext2"      );      // Read-write local storage for disk blocks, it is used both as a cache and as persisteny writable storage      const idbDevice = await CheerpX.IDBDevice.create("block1");      // A device to overlay the local changes to the disk with the remote read-only image      const overlayDevice = await CheerpX.OverlayDevice.create(        cloudDevice,        idbDevice      );      // Direct acces to files in your HTTP server      const webDevice = await CheerpX.WebDevice.create("");      // Convenient access to JavaScript binary data and strings      const dataDevice = await CheerpX.DataDevice.create();
      const cx = await CheerpX.Linux.create({        mounts: [          { type: "ext2", path: "/", dev: overlayDevice },          { type: "dir", path: "/app", dev: webDevice },          { type: "dir", path: "/data", dev: dataDevice },          { type: "devs", path: "/dev" },        ],      });    </script>  </head>  <body style="height: 100%; background: black;">    <pre id="console" style="height: 100%;"></pre>  </body></html>
A virtual system image, such as debian_large, is a complete snapshot of an operating system’s files and configurations. CheerpX uses this image to simulate a Linux environment within your browser, allowing it to execute applications as if they were running on a native Linux system. This example is inteded to quickly get you up-and-running using a pre-deployed disk image from our cloud backend, for a much more self-contained example please see the Simple Executable tutorial
3. Enable cross-origin isolation
CheerpX requires SharedArrayBuffer, which itself requires the site to be cross-origin isolated. To enable cross-origin isolation, serve over HTTPS and set the following headers:
Cross-Origin-Embedder-Policy: require-corpCross-Origin-Opener-Policy: same-originFor detailed instructions on how to configure headers in Nginx, check our Nginx configuration guide.
During development, you don’t need to use HTTPS if you’re using localhost as the origin, the COEP and COOP headers are always required though. You’ll need to make sure you serve over HTTPS when you deploy.
Cross-origin isolation may break existing site functionalityCross-origin isolation is a security feature that might impact your site in unexpected ways. For example, if you’re embedding third-party iframes or opening cross-origin popup windows, you may need to make changes to your site to make them work. Test carefully!
4. Attach and interact with a console
To be able to see the output printed by the program, use setConsole method to use an HTML element as a console. Add the following code at the very end of the <script> tag in the example above.
cx.setConsole(document.getElementById("console"));5. Run an executable
Executables are started using the the run API. Add the following code to the <script> tag to run a full-featured shell in your browser.
await cx.run("/bin/bash", ["--login"], { env: [ "HOME=/home/user", "USER=user", "SHELL=/bin/bash", "EDITOR=vim", "LANG=en_US.UTF-8", "LC_ALL=C", ], cwd: "/home/user", uid: 1000, gid: 1000,});Now you can interact with the console to run commands. Make sure to give focus to the console element by clicking on the page if what you type on your keyboard is not displayed.
Complete code
<!doctype html><html lang="en" style="height: 100%;">  <head>    <meta charset="utf-8" />    <title>CheerpX Getting Started</title>    <script src="https://cxrtnc.leaningtech.com/1.2.2/cx.js"></script>    <script type="module">      // The read-only disk image from Leaning Technologies' fast cloud backend      const cloudDevice = await CheerpX.CloudDevice.create(        "wss://disks.webvm.io/debian_large_20230522_5044875331.ext2"      );      // Read-write local storage for disk blocks, it is used both as a cache and as persisteny writable storage      const idbDevice = await CheerpX.IDBDevice.create("block1");      // A device to overlay the local changes to the disk with the remote read-only image      const overlayDevice = await CheerpX.OverlayDevice.create(        cloudDevice,        idbDevice      );      // Direct acces to files in your HTTP server      const webDevice = await CheerpX.WebDevice.create("");      // Convenient access to JavaScript binary data and strings      const dataDevice = await CheerpX.DataDevice.create();
      const cx = await CheerpX.Linux.create({        mounts: [          { type: "ext2", path: "/", dev: overlayDevice },          { type: "dir", path: "/app", dev: webDevice },          { type: "dir", path: "/data", dev: dataDevice },          { type: "devs", path: "/dev" },        ],      });
      // Interact with a console      cx.setConsole(document.getElementById("console"));
      // Run a full-featured shell in your browser.      await cx.run("/bin/bash", ["--login"], {        env: [          "HOME=/home/user",          "USER=user",          "SHELL=/bin/bash",          "EDITOR=vim",          "LANG=en_US.UTF-8",          "LC_ALL=C",        ],        cwd: "/home/user",        uid: 1000,        gid: 1000,      });    </script>  </head>  <body style="height: 100%; background: black;">    <pre id="console" style="height: 100%;"></pre>  </body></html>
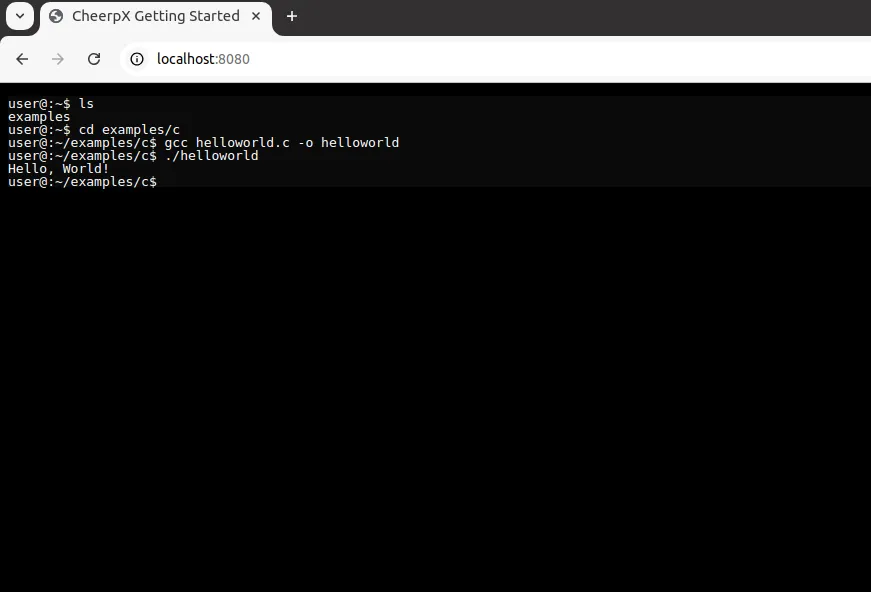
The result
If everything is set up correctly, you should be able to see and perform the following actions:

Have Questions?
We’re here to help! If you have any questions or concerns, feel free to explore our guides or reference section or check out our frequently asked questions. You can also connect with our supportive community on Discord, and reach out whenever you’d like!